 Data loss is the most unwanted thing that any user ever want. However its uncontrollable and no matter how many preventive measures you take, your data is in a constant risk. The Windows 8 users who have recently switched on Windows 8 from their beloved windows 7, they need to know about how they can create Backups and can restore them using windows 8 to minimize the adverse affects of data loss.
Windows 8 have no option of creating backup through file history feature on your local drive which was previously a blessing for the Windows Users.However you can easily create Backups and restore them following the procedure mentioned below.
Creating a Backup in Windows 8
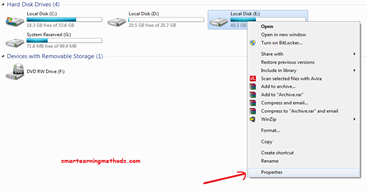
step 1: choose a drive like “E” or “F”, where you want your Backup to be stored. once you decide, right click on the drive and select properties.
Step 2 : enable sharing for the required drive.
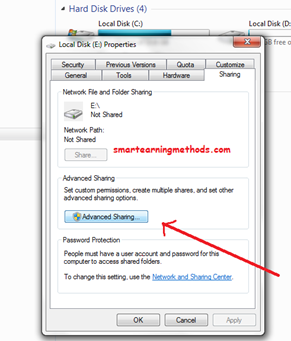
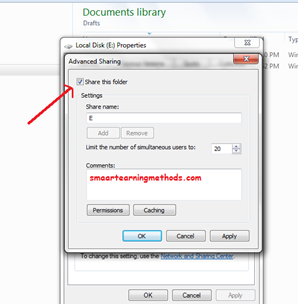
step 3: click on Advance sharing and click on the following share this folder.
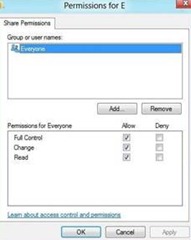
step 4: Allow every one and click ok.
now copy the network path to change local drive When the drive listed in the shared location.
step 5: you can now replace the existing back up drive path to local drive path, choosing the required path.
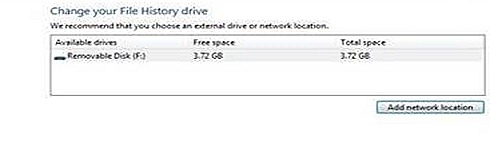
this will create a back up of all your desktop items, libraries, documents in your specified local drive. would be stored to specified local drive.
Restoring Backup In Windows 8
there is no point in creating a backup if you don’t know how to restore it. once you have created a backup, good enough, you can always retrieve your lost data by restoring it. we will now learn how can windows 8 users can restore their lost data from a pre created backup. in simple steps.
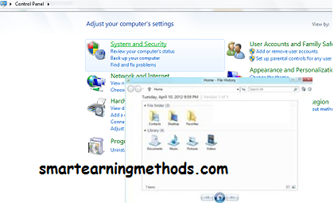
step 1: Turn on your file history by selecting “File history” from “system and security” in Control Panel.
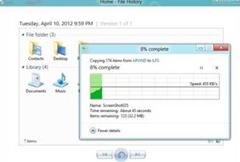
step 2: click on restore personal files and select the folders and libraries which you plan to back up. click restore after selecting the folder and libraries.
step 3 : now specify any defined location where you want your restoration to take place
step 4: choose the contents for restoration, and that will restore your backup files on your chosen location in your PC.
so you see Windows 8 might turn out to be a little tricky for you in the beginning, where you will have to find things to make it worthy of using, but trust me, tricks are simpler than they seem to be. hope you liked the tutorial .
create your backup now and minimize the loses!
you might also like:
windows 8 tutorial 3 – PDF TO IMAGE CONVERTER
windows 8 Tutorial 2- Screen Saver
windows 8 Tutorial 1 – Short cut to icons
enjoy!